Creating a visually striking 3D scene goes beyond just placing objects in a virtual space - it requires careful attention to composition, lighting, materials, and optimization. Whether refining a product visualization, an architectural render, or a creative concept, small adjustments can make a significant difference in realism and presentation.
This guide outlines 15 essential steps to elevate your scene, from setting up a solid foundation to fine-tuning textures and lighting effects. Each tip is designed to improve both the visual quality and efficiency of your workflow in Vectary Studio. By the end, you’ll have the tools to turn a basic setup into a polished masterpiece.
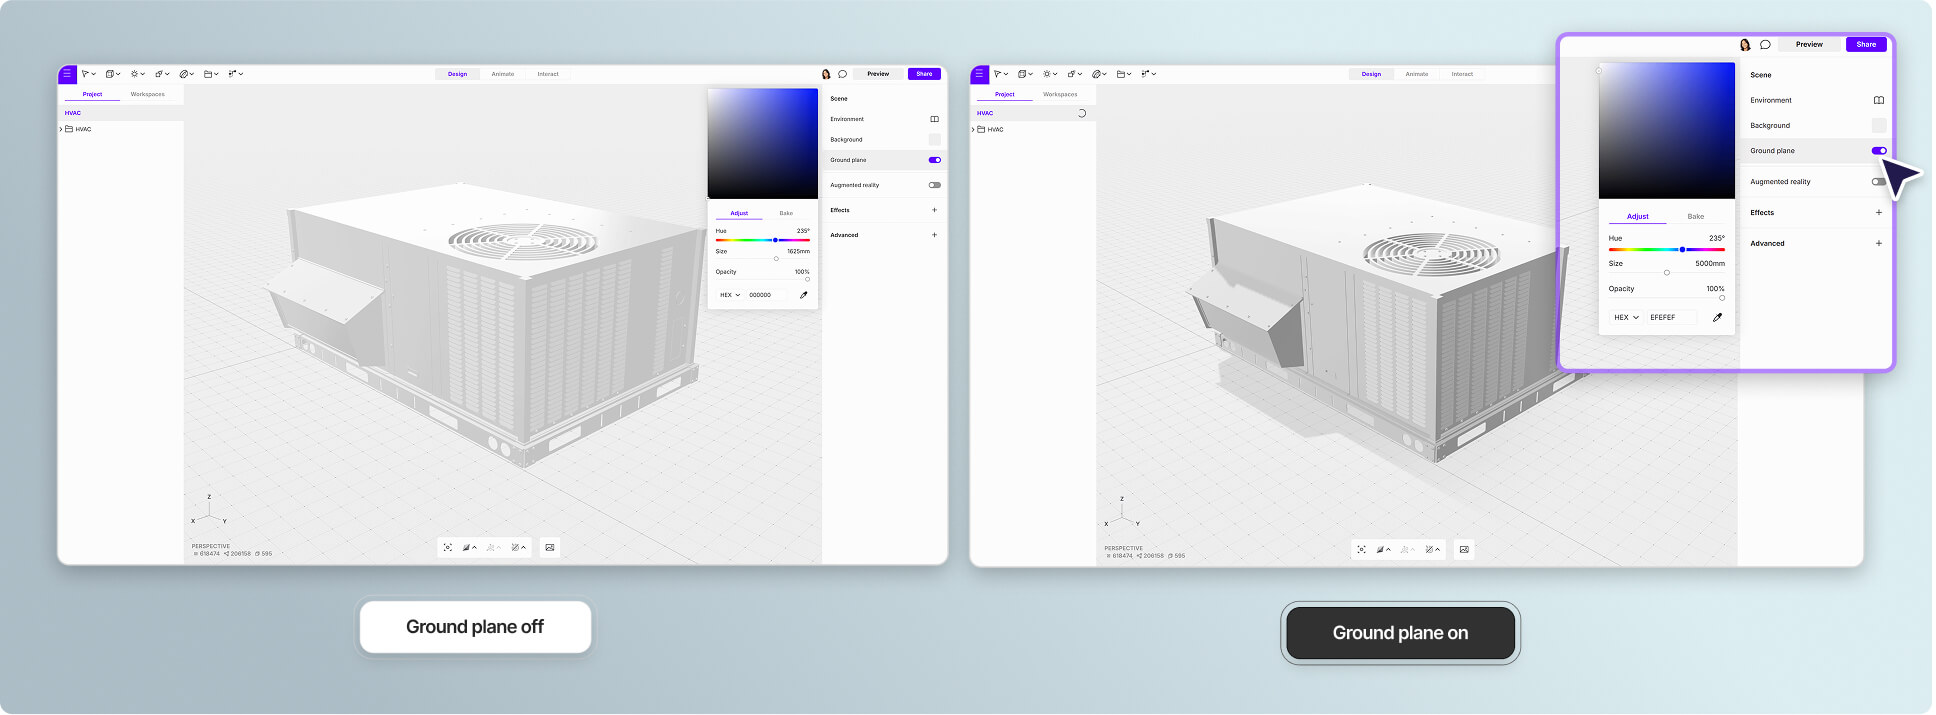
1. Establishing the ground plane
A well-defined ground plane serves as a crucial foundation for any 3D scene, providing essential depth perception and spatial context. This fundamental element creates a natural frame for objects and enhances the overall realism of the composition. For static scenes, switching the ground plane from dynamic to baked allows for additional detail and increased realism.
The ground plane's parameters - including scale, color, and texture - should be carefully calibrated to complement the scene's primary objects, as different scales and compositions may require slightly different settings.
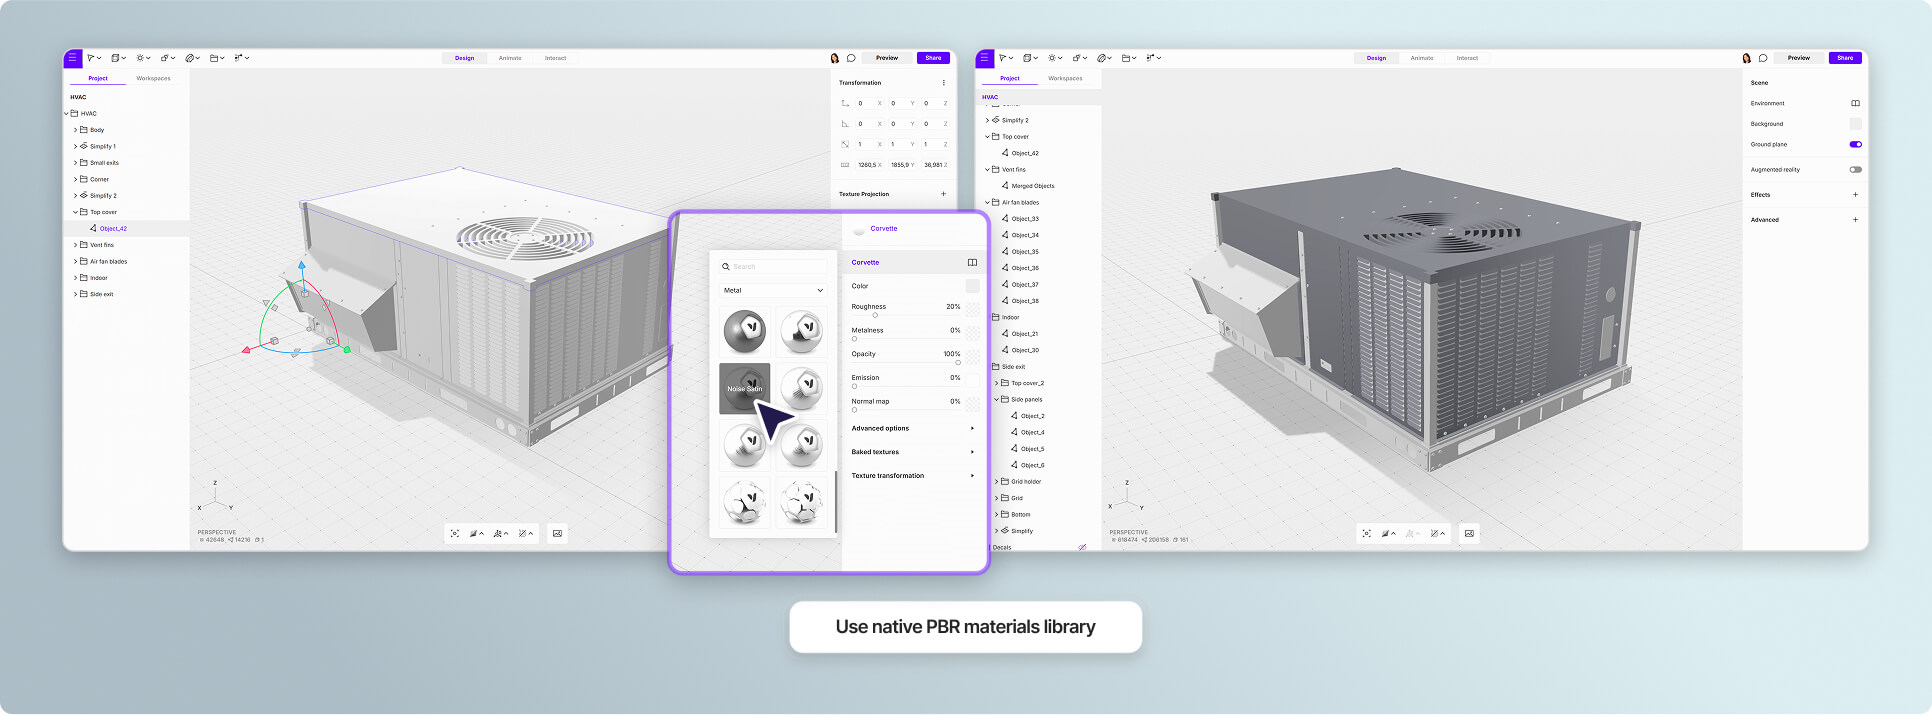
2. Leveraging studio library materials
The Studio Library offers an extensive collection of PBR (Physically Based Rendering) standard materials, streamlining the creation process. These pre-configured materials establish a solid foundation for scene development, featuring comprehensive categories including metals, plastics, wood, concrete, fabrics, and numerous other material types.
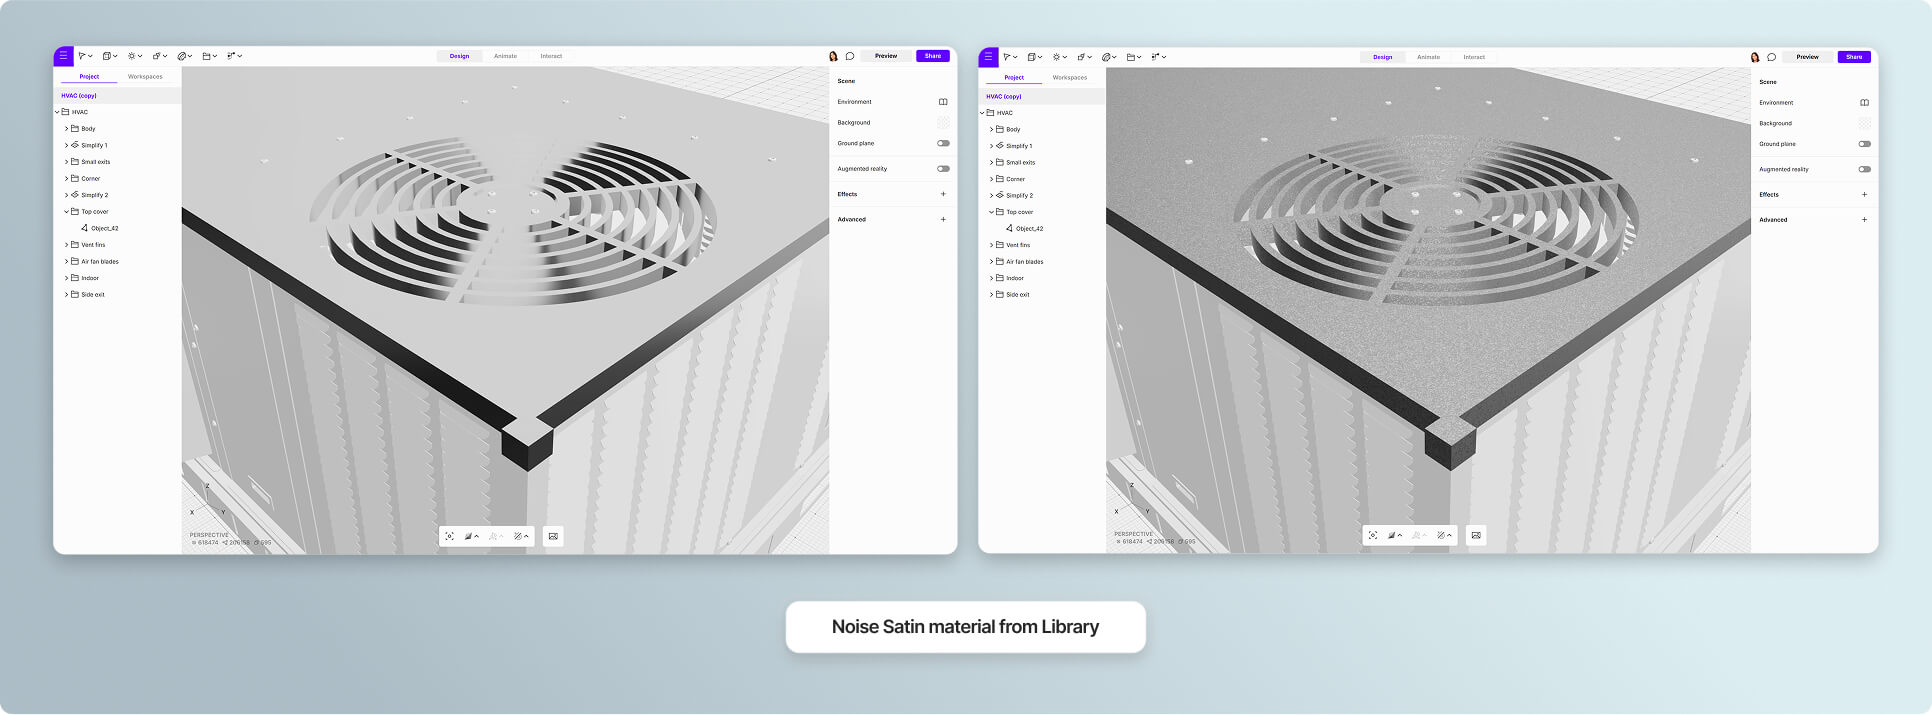
3. Enhancing detail through material noise
For geometrically simple objects lacking detailed features such as fillets or bevels, implementing noise textures in roughness or normal map channels can significantly enhance visual interest. This technique creates subtle variations in light interaction, elevating the surface complexity and overall visual fidelity without requiring additional geometry.
4. Mastering texture projection & tiling
Texture projection serves as a critical tool for achieving professional results. While default cube projection may suffice for basic needs, exploring alternative projection methods such as planar, cubic, or spherical mapping can dramatically improve texture application. Each projection type's axis can be adjusted through the left mouse button (LMB) interface, offering precise control over texture placement and orientation.
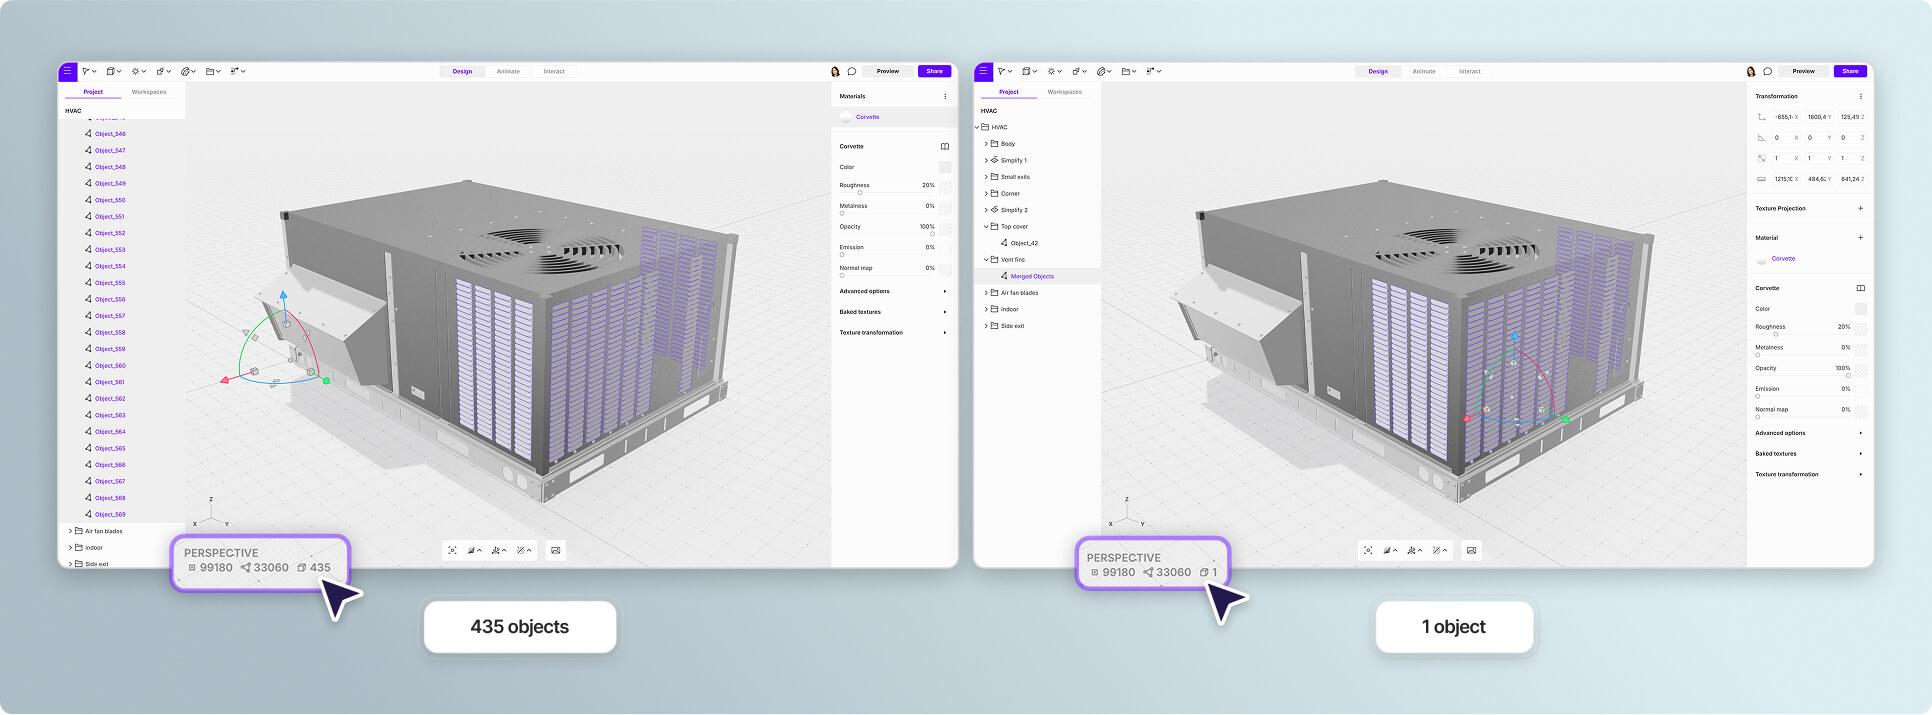
5. Merging duplicates or using instancing
Scene optimization demands efficient object management. Merging objects (accessible via right-click or the 'X' shortcut) consolidates multiple elements into single objects, streamlining workflow and simplifying texture application. For situations requiring repeated elements, Duplicate Linked functionality or Array modifiers provide memory-efficient alternatives, maintaining scene performance while preserving individual object control.
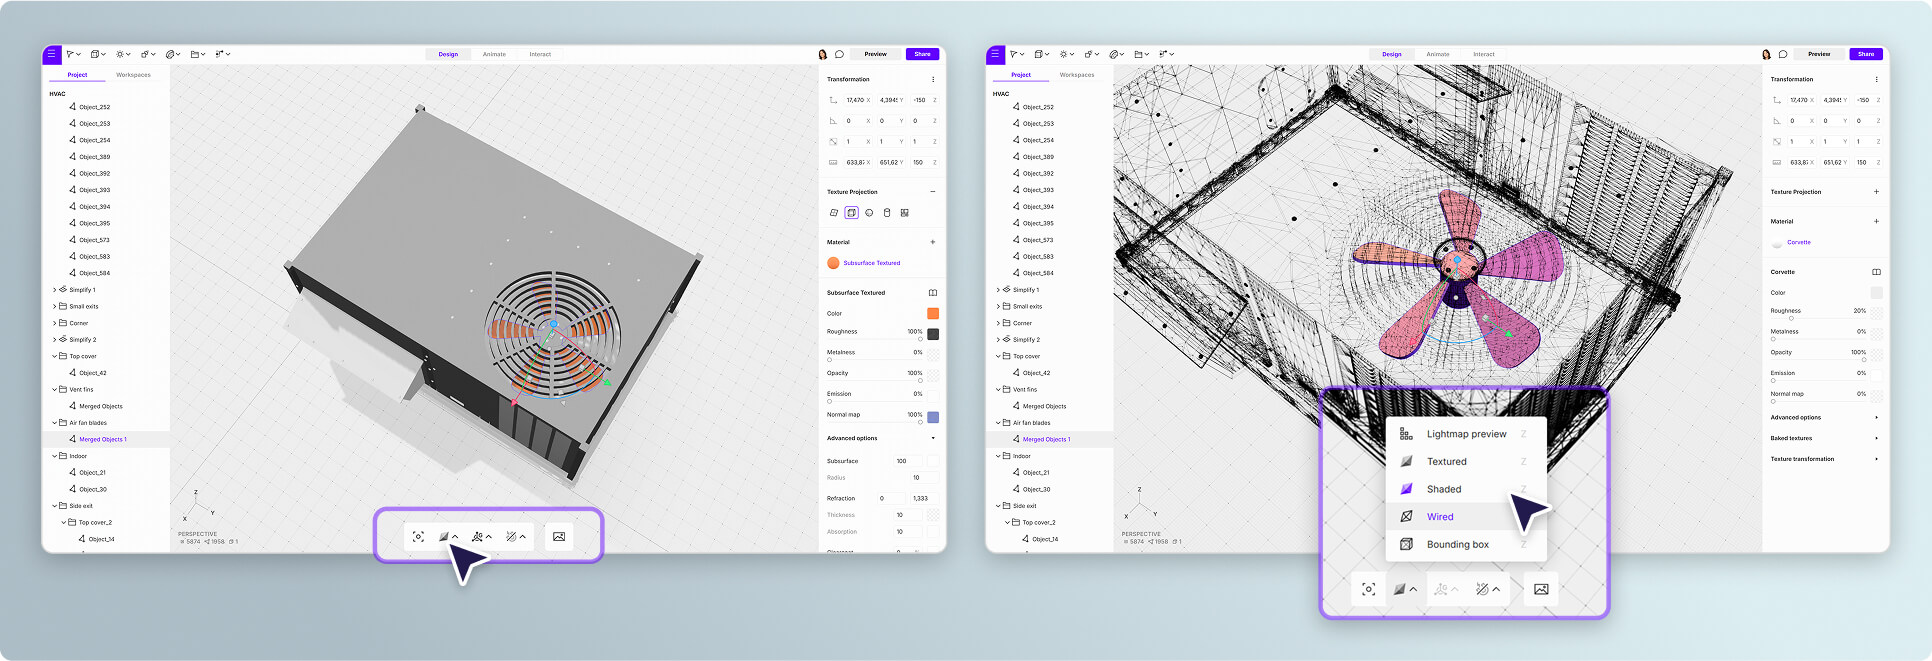
6. Using different view modes to navigate better through the scene
Vectary Studio offers multiple viewing modes that are particularly useful in the early stages of scene development. Switching between Wireframe, Shaded, or Textured views allows for better navigation and understanding of object placement within the scene.
7. Object isolation
Complex scene navigation becomes manageable through strategic object isolation. During texturing phases, the ability to isolate specific objects or groups (accessible through the context menu) allows for focused detail work. This functionality, coupled with the Show All feature, enables efficient switching between isolated and full scene views, maintaining workflow momentum.
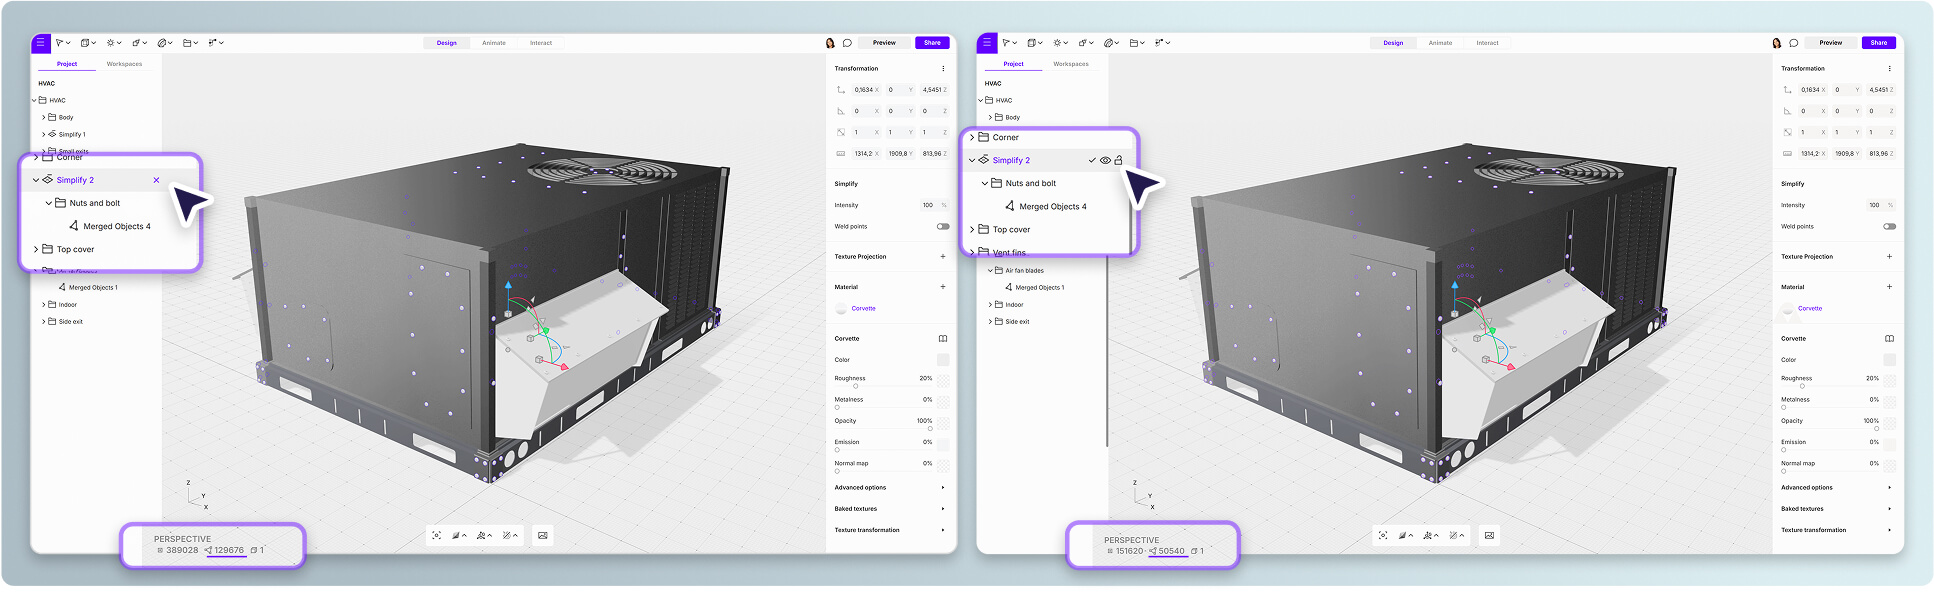
8. Polygon reduction with simplify modifier
The Simplify modifier serves as a powerful optimization tool for managing scene complexity. This modifier efficiently reduces polygon counts based on user-defined parameters, particularly valuable for background or secondary objects that don't require full geometric detail. While extreme reduction below certain thresholds may compromise geometric integrity, strategic application can yield significant optimization benefits - as demonstrated with small elements like screws, where polygon counts can be reduced by over 50% without noticeable visual impact. For NURBS-based geometries, the native NURB editor provides additional control over mesh resolution, allowing precise balance between detail and performance.
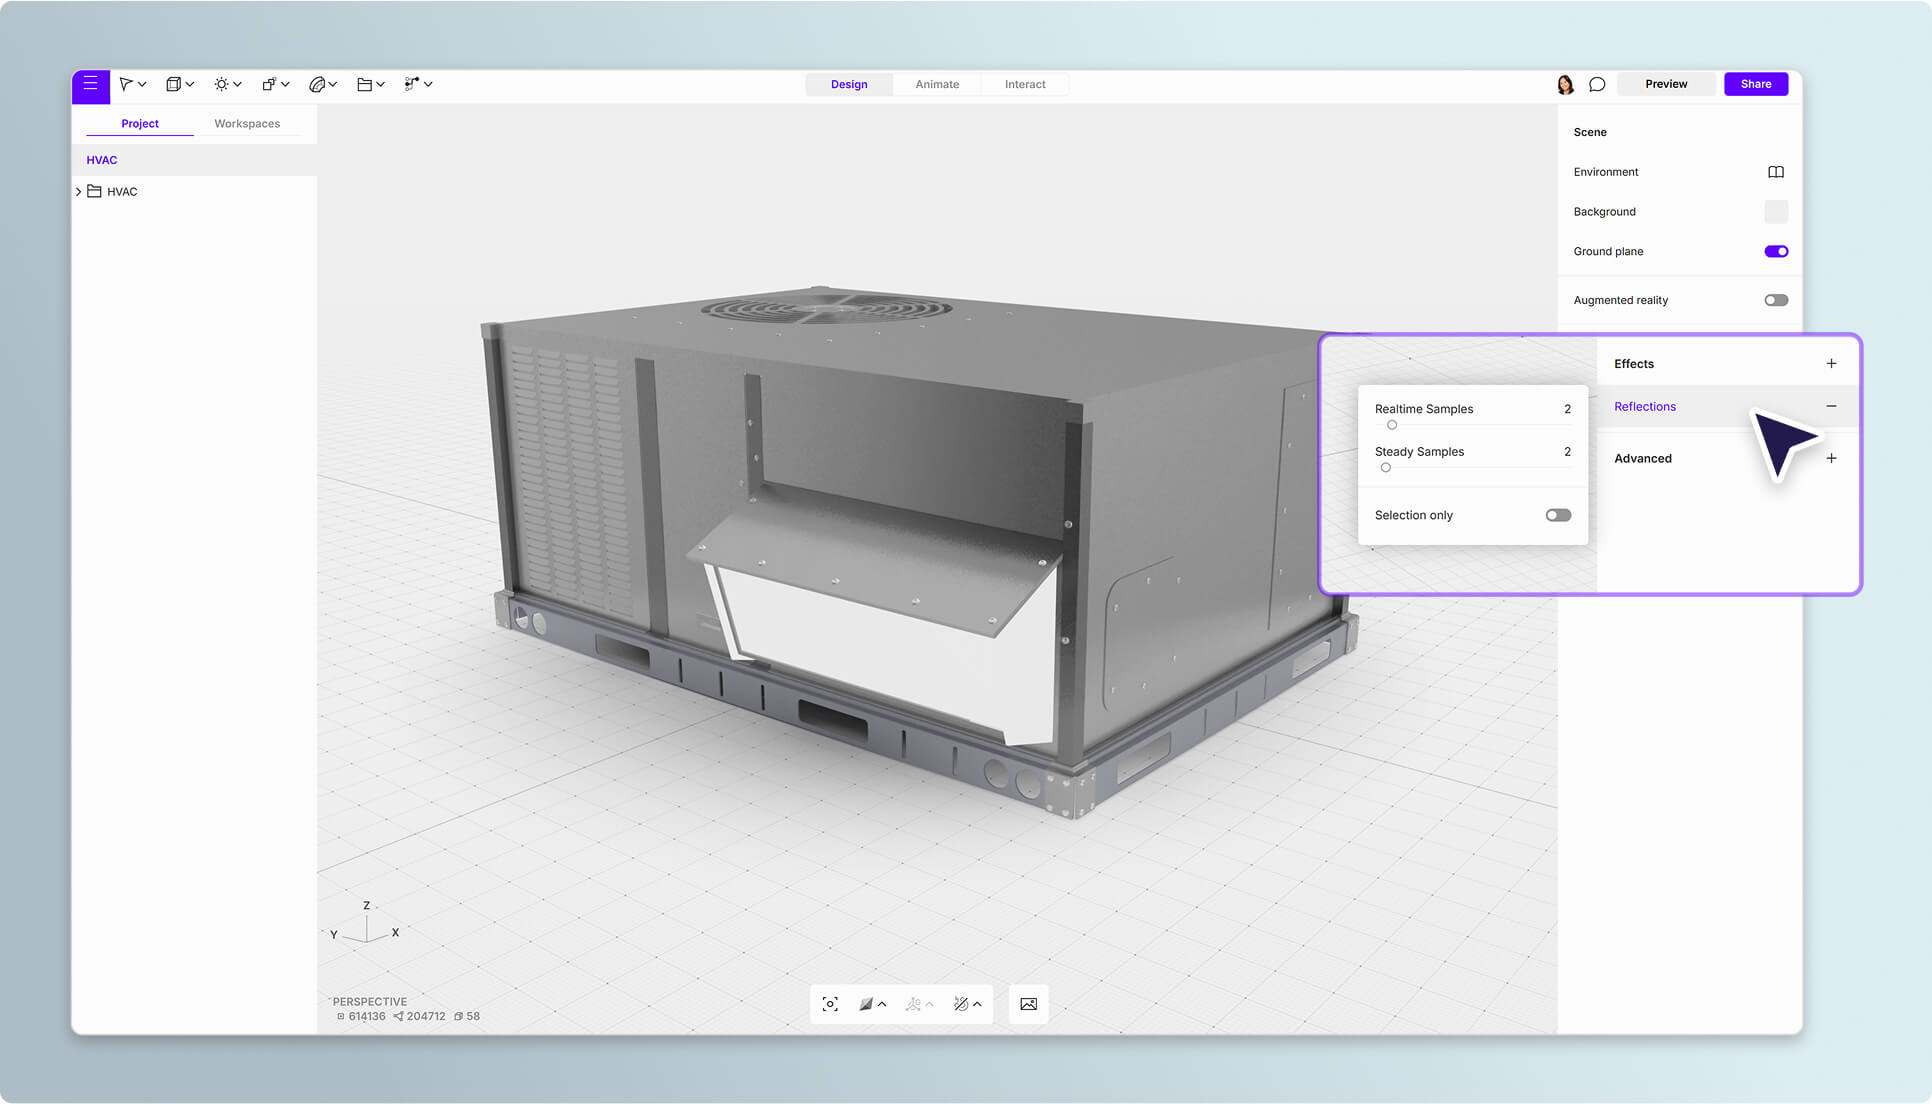
9. Optimizing scene reflections
Reflection effects serve as a crucial element in achieving photorealistic renders, particularly in scenes featuring metallic materials. While this effect significantly enhances visual fidelity by adding a layer of realism, careful optimization is essential for maintaining performance. For consistent results, matching Realtime and Steady sample values is recommended, with even minimal settings (such as 2 samples) often providing sufficient visual quality. To optimize performance in complex scenes, selective application of reflection effects can be employed - limiting the effect to specific objects rather than the entire scene. This targeted approach maintains visual impact while preserving computational efficiency.
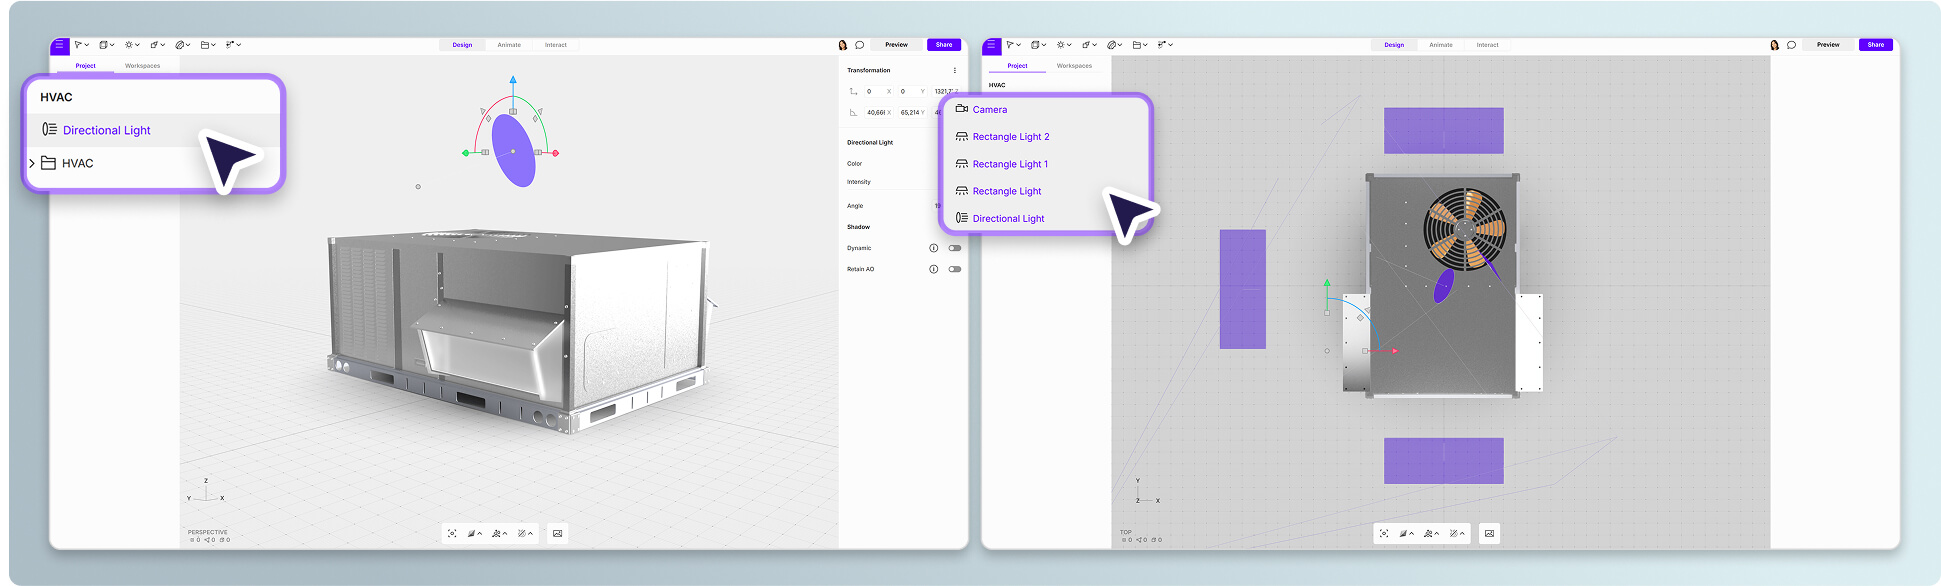
10. Starting with a simple light setup
A well-balanced lighting setup begins with a directional light to establish shadows and contrast, preventing a flat appearance. A typical approach involves positioning the main light at a three-quarter angle, ensuring one side remains slightly darker. jAdditional rectangular lights placed at a 45-degree angle help create reflections on surfaces. Enabling shadows increases realism, but not all lights need shadows enabled, as this impacts performance. Typically, shadows turned on one directional light and a single rectangular light. Option Retain AO should be enabled for all lights to preserve ambient occlusion after baking, especially for metallic materials.
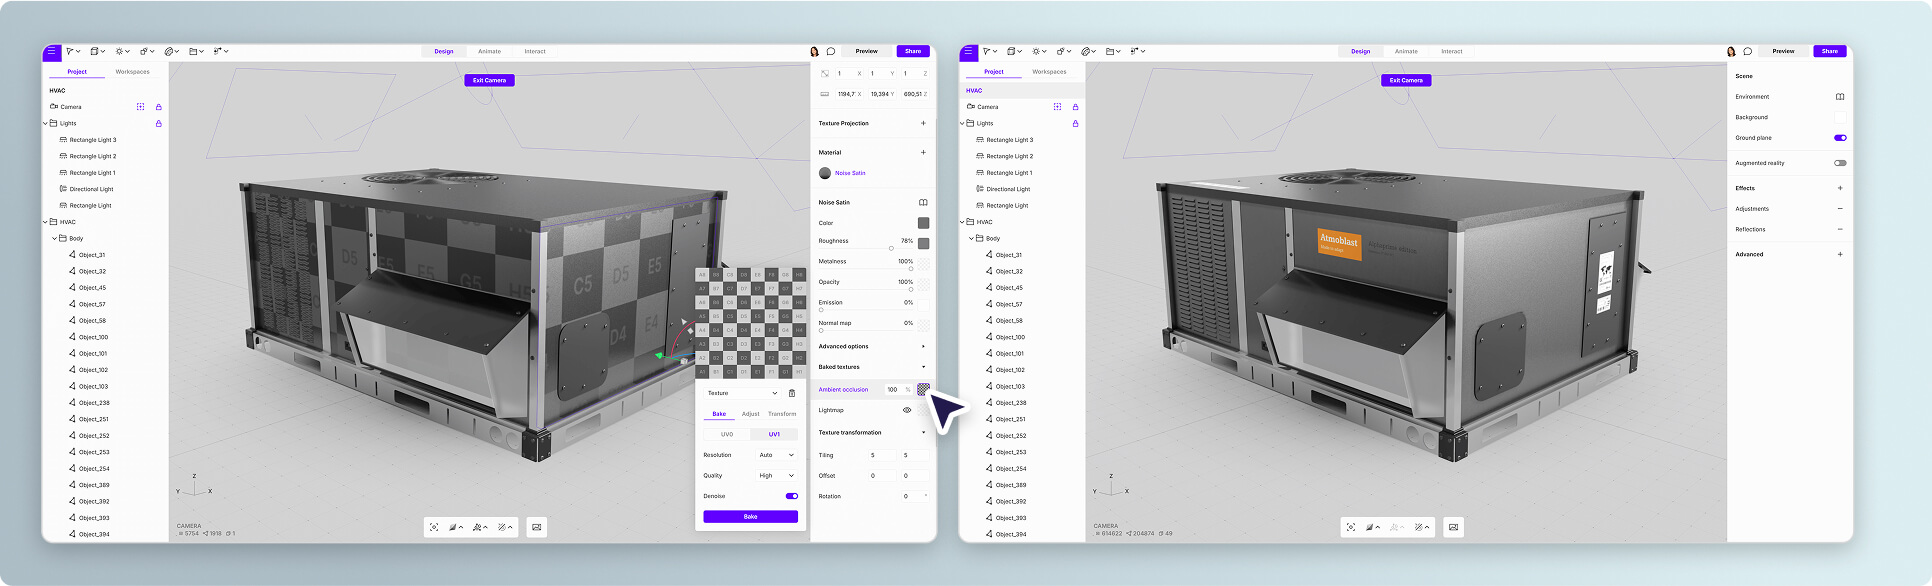
11. Light and ambient occlusion baking
Baking ambient occlusion (AO) and light maps (LM) represents a crucial step after establishing base materials and lighting setups. This process enhances shadow definition by baking additional depth information directly into the geometry. For optimal performance, implementing either light maps or ambient occlusion independently is recommended, as simultaneous use can significantly impact file size. Light maps, while comprehensive in capturing illumination data, should be used selectively - particularly for metallic surfaces where their impact may be negligible compared to the performance cost. Ambient occlusion often proves sufficient for metallic materials, providing necessary shadow detail without the additional overhead of full light map data.
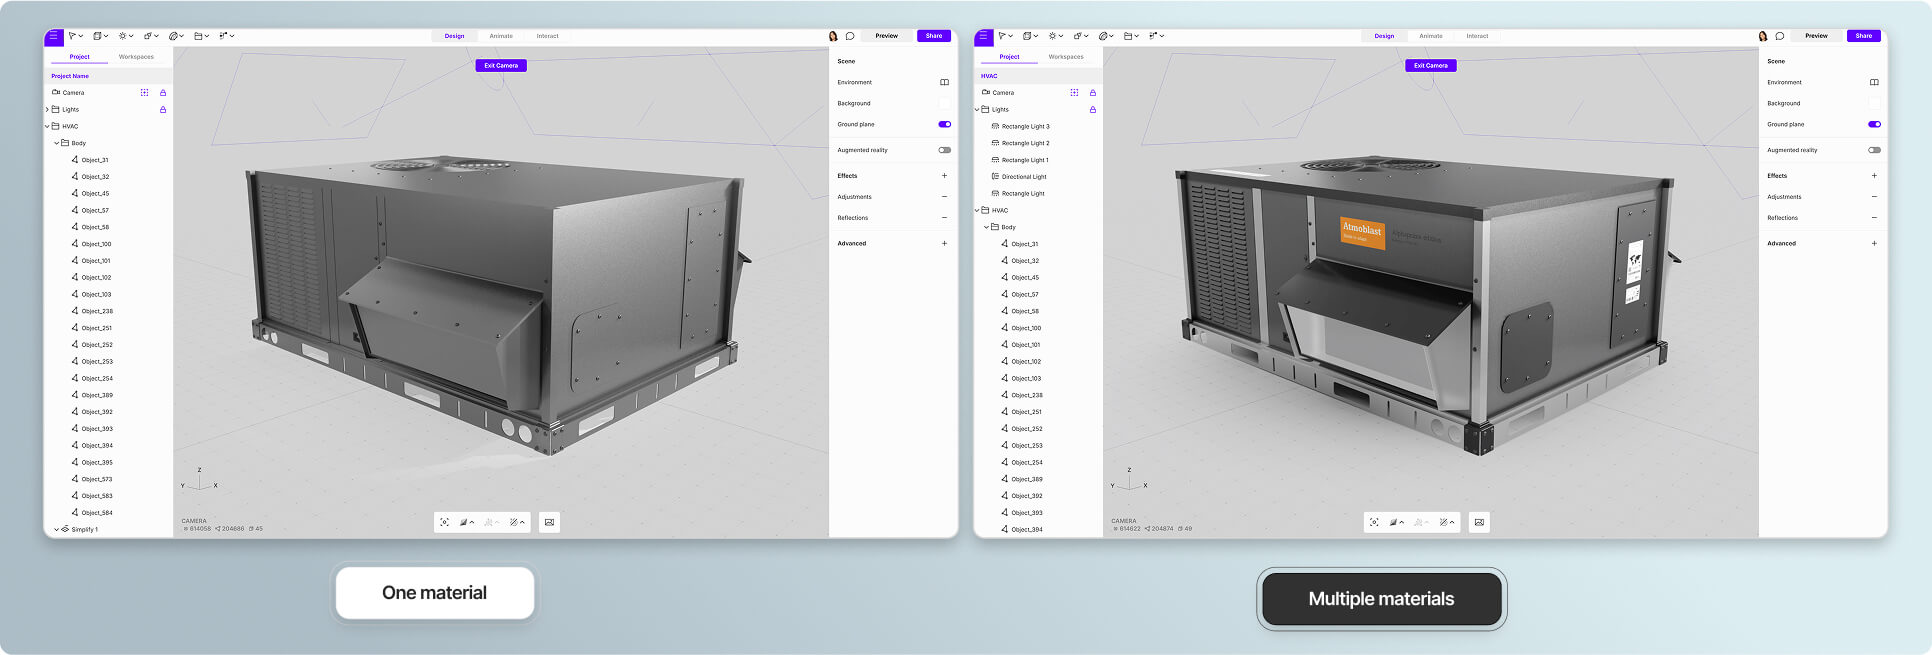
12. Material diversity for visual impact
Strategic variation in material properties plays a crucial role in creating visually compelling scenes. While real-world objects may share similar materials, artistic interpretation demands thoughtful material diversity to prevent visual monotony. Creating visual hierarchy through contrasting material properties - combining rough and polished surfaces, varying reflectivity levels, and implementing strategic color variation - adds depth and complexity to the composition. For instance, pairing matte surfaces with high-gloss elements, or offsetting dark materials with lighter accents, creates natural focal points and guides the viewer's eye through the scene. This deliberate material differentiation enhances overall scene readability and visual interest, even when working within a limited color palette.
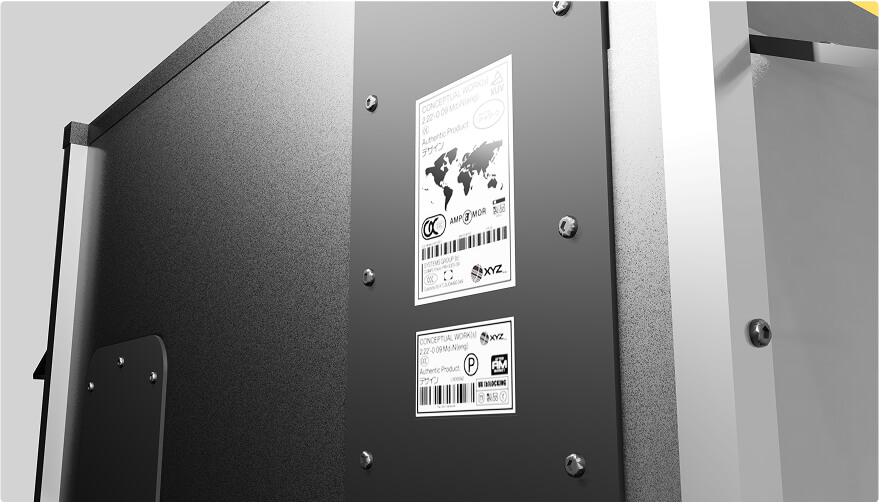
13. Enhancing details with decal implementations
Decals provide a powerful method for adding fine surface details and branding elements without increasing geometric complexity. The process is streamlined through a simple drag-and-drop workflow, supporting both PNG and SVG file formats directly onto the canvas. Once placed, decals can be precisely positioned and wrapped around specific objects using pivot points for accurate alignment. This technique proves particularly valuable for incorporating technical markings, safety warnings, operating instructions, and brand identity elements such as logos or model designations. The non-destructive nature of decals allows for easy updates and modifications while maintaining scene performance.
14. Optimizing camera pivot for viewer experience
Proper camera pivot point alignment stands as a crucial yet often overlooked aspect of scene presentation. Centering the camera pivot point with the main object ensures consistent viewing angles across different devices and prevents unwanted cropping or perspective distortion. This fundamental setup step significantly impacts how the scene translates across various viewing platforms, directly affecting the viewer's ability to properly examine the model. While seemingly basic, this technical consideration proves essential for maintaining professional presentation quality and ensuring the intended visual impact reaches the audience effectively.
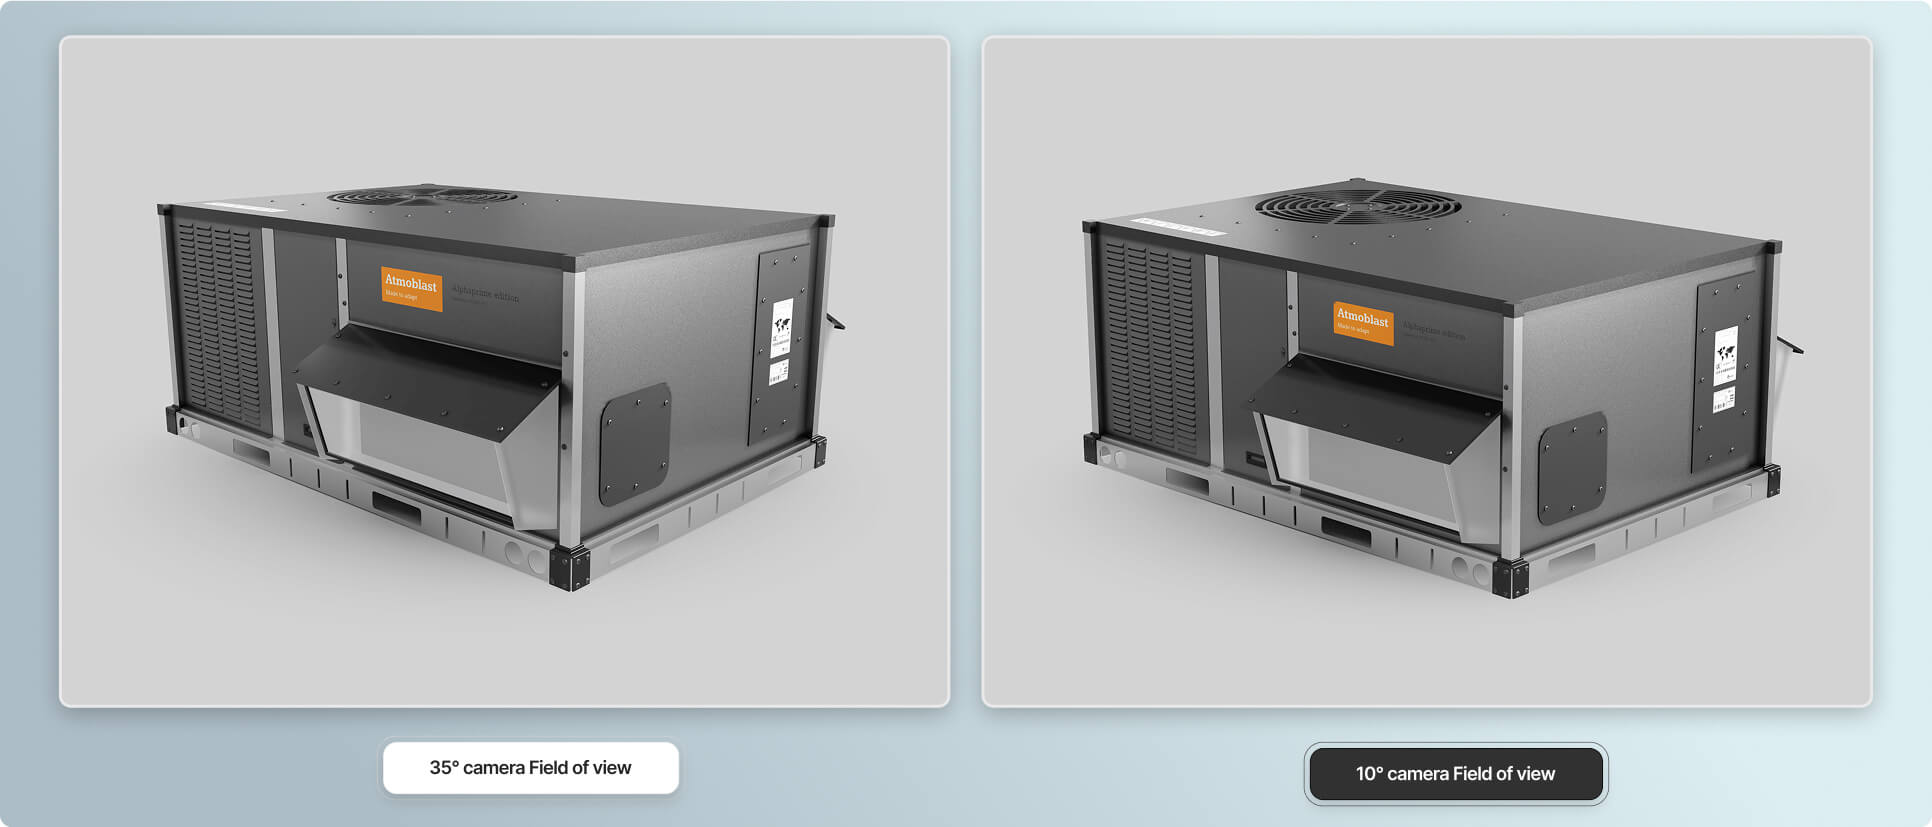
15. Exploring different camera field of views
Just like in real-world photography, adjusting the camera's field of view (FOV) changes the composition and perspective of the scene. Switching between ultra-wide, standard 35mm, or orthographic views allows for different visual styles, where some angles may appear more dynamic than others.
Try Business Workspaces
Get access to team solutions for collaboration, optimization, CAD-to-web sharing, DAM and AR.